Calling all carb connoisseurs and baking beginners! Is the aroma of freshly baked bread a siren song to your soul? Do visions of crusty, golden loaves dance in your dreams? Then gather ’round, friends, because we’re about to embark on a journey to rustic bread bliss, and all it takes is 4 simple ingredients and a sprinkle of magic (okay, maybe just yeast ).
Forget the intimidating mixers and the endless kneading marathons. This recipe is for those of us who want bakery-worthy bread without the fuss. We’re talking throw-everything-in-a-bowl, let-it-rise-and-bake kind of easy. Perfect for busy weeknights, lazy weekends, or simply whenever that bread craving strikes (which, let’s be honest, is probably most of the time).
So, ditch the store-bought stuff, and let’s get our hands dirty (well, not too dirty – remember, no kneading!). We’ll whip up a loaf so good, you’ll be wowing your family and friends with your newfound baking prowess. Think thick, chewy slices begging to be slathered with butter, dipped in soup, or toasted to crispy perfection. Rustic bread that’s not just delicious, it’s a testament to the fact that sometimes, the simplest things in life are truly the most satisfying.
Ready to transform your kitchen into a haven of yeasty goodness? Then buckle up, because this Easy 4 Ingredient Rustic Bread Recipe is about to take you on a flavor adventure you won’t soon forget!

Ingredients for basic rustic bread:
All-purpose flour: It’s likely already sitting in your pantry, meaning you can whip up rustic bread without a special trip to the store. All-purpose flour has slightly less protein than bread flour, which can mean a less dramatic rise. However, with good technique and fermentation time, you can still achieve a beautiful loaf.
Water: Water hydrates the flour, activating the gluten proteins that give bread its structure and elasticity. Think of it like wetting clay to mold it – enough water allows the dough to develop a nice structure for that perfect rustic rise and chewy crumb.
Instant yeast: Instant yeast is a true time-saver! It doesn’t require any pre-activation or “blooming” in water, meaning you can simply mix it in with the other dry ingredients and get on with your bread-baking journey. This is especially helpful for those of us who live in fast-paced worlds or simply value simplicity.
Think of those little packets in the store like tiny treasure chests of yummy bread-raising power. Each one holds a whopping 7 grams of yeast, which is about the same as 2 and ¼ teaspoons.
Salt: Salt acts like a mini-magician, strengthening the gluten strands in your dough. This leads to a better rise, a more even crumb (think fluffy clouds, not a brick!), and a beautifully shaped loaf that doesn’t collapse like a deflated balloon. So, if you’re dreaming of that iconic oven spring – that glorious rise in the oven – thank salt for the assist!
When it comes to salt in rustic bread, I’m all about finding the sweet spot, that perfect sprinkle that makes your taste buds sing without turning things into a salt lick. You know what I mean?
For me, that usually means keeping the salt-to-flour ratio somewhere between a friendly 1.5% and a bold 2.5%. Now, translating that into teaspoons takes a bit of kitchen wizardry (or just a trusty scale, whichever floats your boat). But for those wanting a quick guesstimate, consider this: 1 teaspoon of salt weighs just over 5 grams, which clocks in around 2% for most flour amounts.
Of course, this is just my starting point, your North Star on the salty seas of bread baking. Feel free to adjust to your heart’s content based on your taste buds! If you crave a bolder bite, crank it up a notch. Prefer things mild? Go gently with the sprinkle. It’s all about personal preference and finding that golden balance between savory and sensational.
Make the dough:
Hey there, bread buddies! Today I’m baking up a cozy little loaf of deliciousness. It’s perfect for solo snacking or a small gathering, but guess what? This recipe scales like a dream! If you’re feeling extra hungry or have a crowd to feed, simply double the ingredients and give the oven a bit longer hug. Easy-peasy, right?
So gather your flour, yeast, and good vibes, and let’s whip up some warm, crusty goodness together! Remember, you’re the captain of the bread boat – double it up, add some secret spices, or keep it classic – it’s all about fun and yummy results.
Oh, kneadless to say (pun intended!), we’re ditching the stand mixer and messy kneading marathons in this recipe. We’re all about rustic bread bliss with minimal effort, and the stretch-and-fold method is our new BFF.
Think of it as a gentle yoga session for your dough – no fancy equipment or contortions required. Just a few relaxing folds here and there, and you’ll be rewarded with a gorgeous loaf that practically bakes itself. Bonus points for the extra counter space you’ll have for that post-bake victory dance!
So, grab your favorite bowl, some flour, water, yeast, and a sprinkle of salt, and let’s get this rustic sourdough party started!
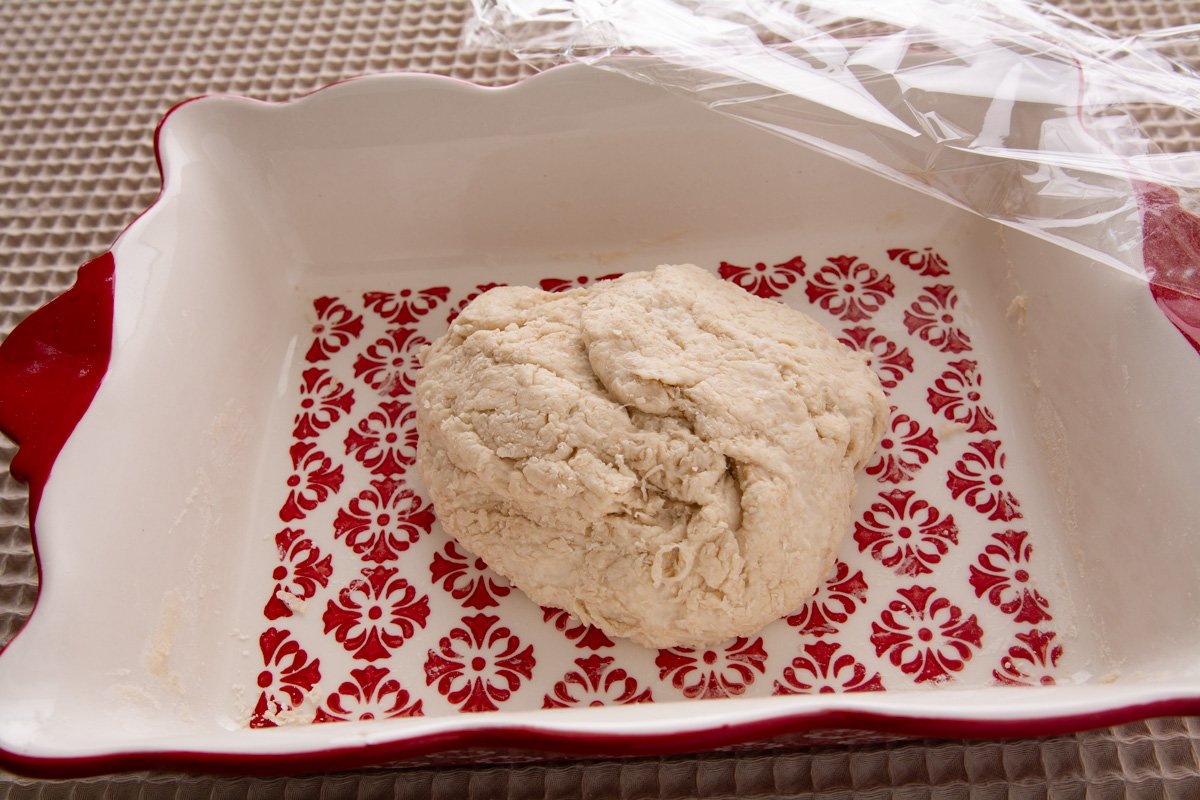
Hydrate that dough: Mix your dry ingredients, then slowly add water until you have a shaggy mass. Don’t worry about perfection here – a few lumps and dry spots are normal.
Let it rest: Cover your bowl and give your dough some quiet time to chill and absorb the moisture.

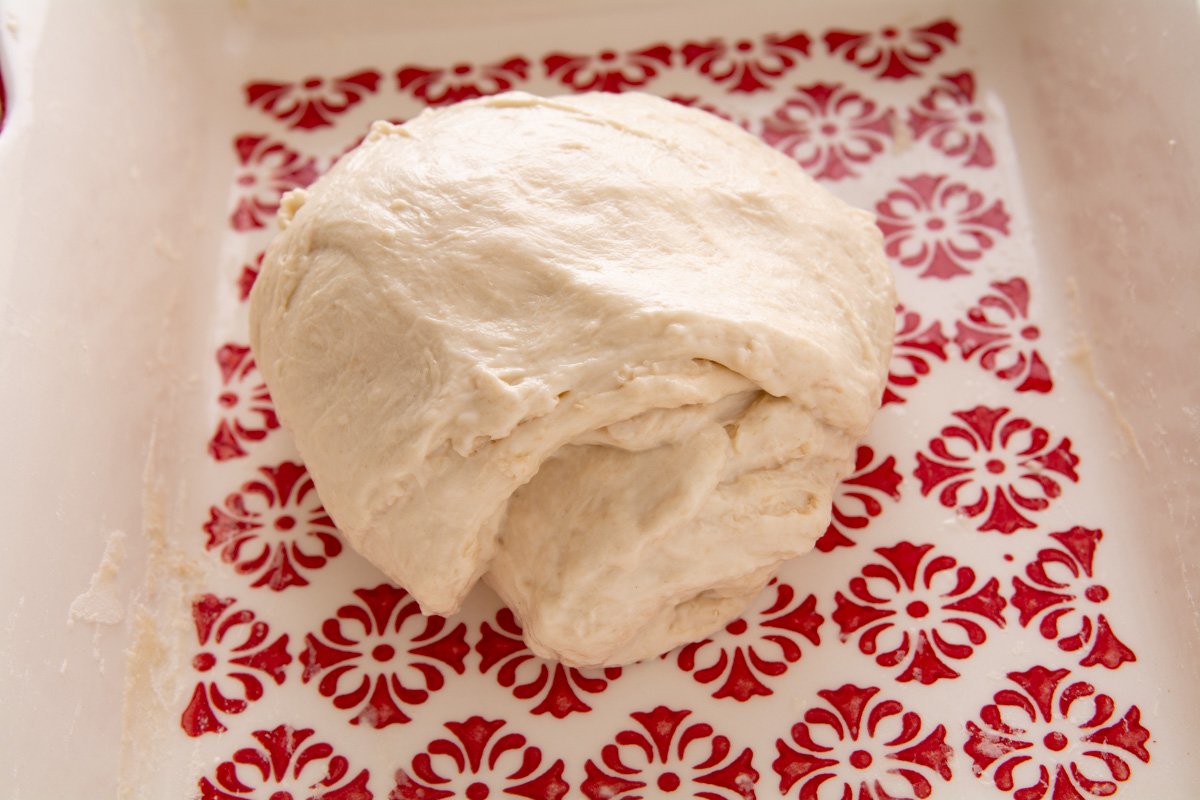
Folding fun: Now comes the magic! Wet your hands slightly (trust me, this prevents sticking), gently grab one edge of the dough, and stretch it outwards. Fold it over onto itself, then repeat with the other three sides.
Rise and repeat: Cover your dough again and let it rise for a while. Once it’s puffed up, do another round of gentle folds.
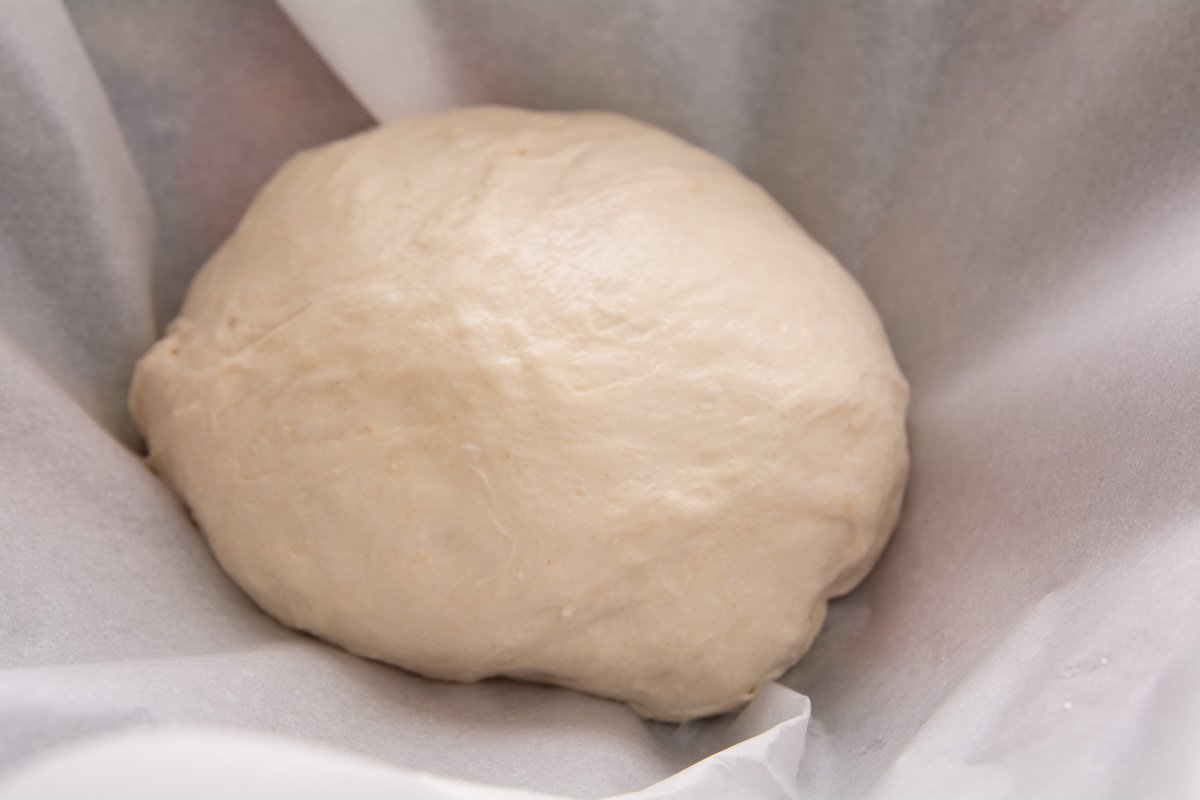
Shaping magic: When your dough has doubled in size, it’s time to shape your future masterpiece! Gently coax it into a round or oblong shape, then place it in a parchment-lined proofing basket or bowl. Then dust the top with some flour. Let your dough rise one last time before gracing it with the oven’s warmth.
Remember, the key is to be gentle and patient with your dough. No need for aggressive kneading or fancy equipment – just love, a few folds, and a sprinkle of baking zen. Soon, you’ll be a rustic bread whisperer, conjuring up loaves that would make any bakery jealous.
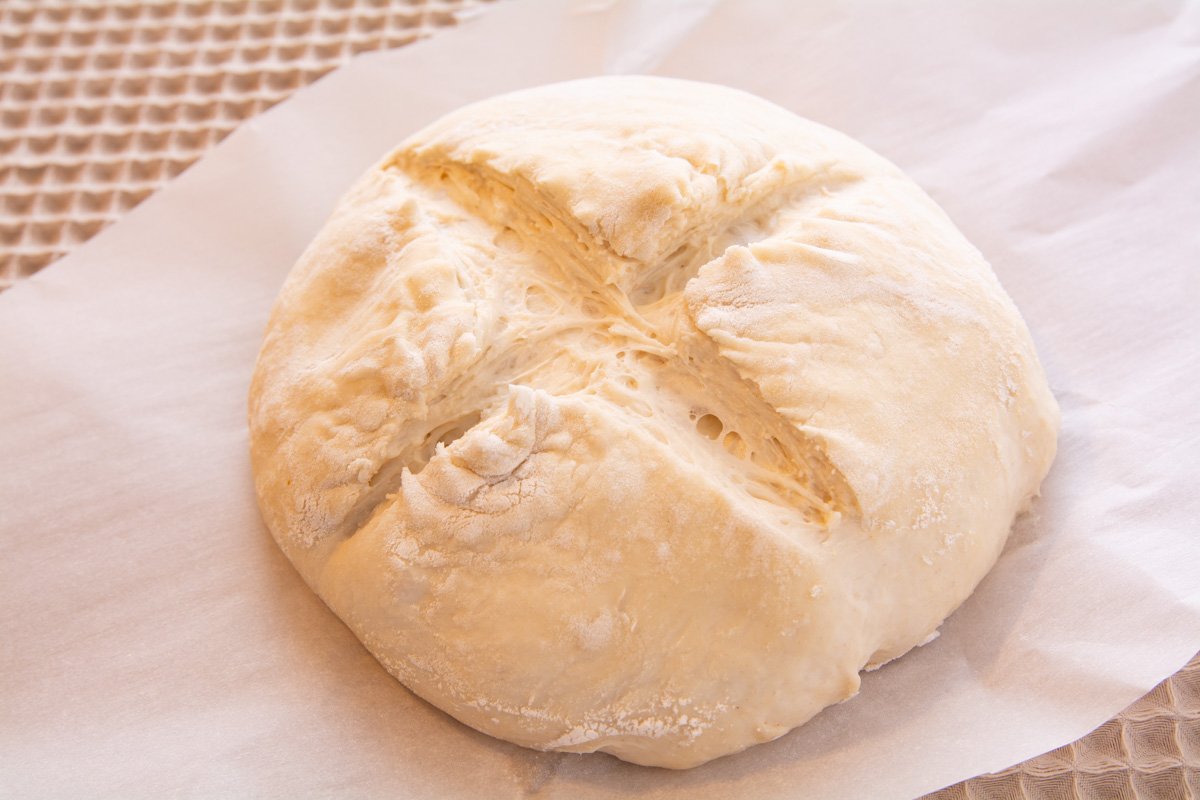
Here’s how to score your dough with confidence:
Tool Time: You have two options!
- Razor blade: A classic choice for its precision and sharpness. Just hold it at a 45-degree angle and gently make one long cut from end to end, about 1/2 inch deep. You can also get fancy with decorative slashes!
- Serrated knife: A great alternative if you’re not comfortable with a blade. Just hold it straight up and down and make shallow cuts about 1/4 inch deep, again going from end to end.
Scoring Tips:
- Don’t overthink it! A few confident strokes are better than many hesitant ones.
- Wet your blade or knife first. This will prevent it from sticking to the dough.
- Score deeply enough. Aim for about 1/2 inch for the classic “ear” effect, or shallower for more decorative cuts.
- Have fun! Get creative with your scoring patterns. Zigzags, leaves, even smiley faces – the possibilities are endless!
Remember, scoring helps your dough release steam as it bakes, leading to that beautiful oven spring and crackly crust we all love. So grab your tool of choice, channel your inner artist, and give your dough ball a little love with some well-placed scores!
Bonus tip: If you’re using a Dutch oven to bake your bread, score it just before you transfer the dough inside. The trapped steam will help create an even more dramatic rise.
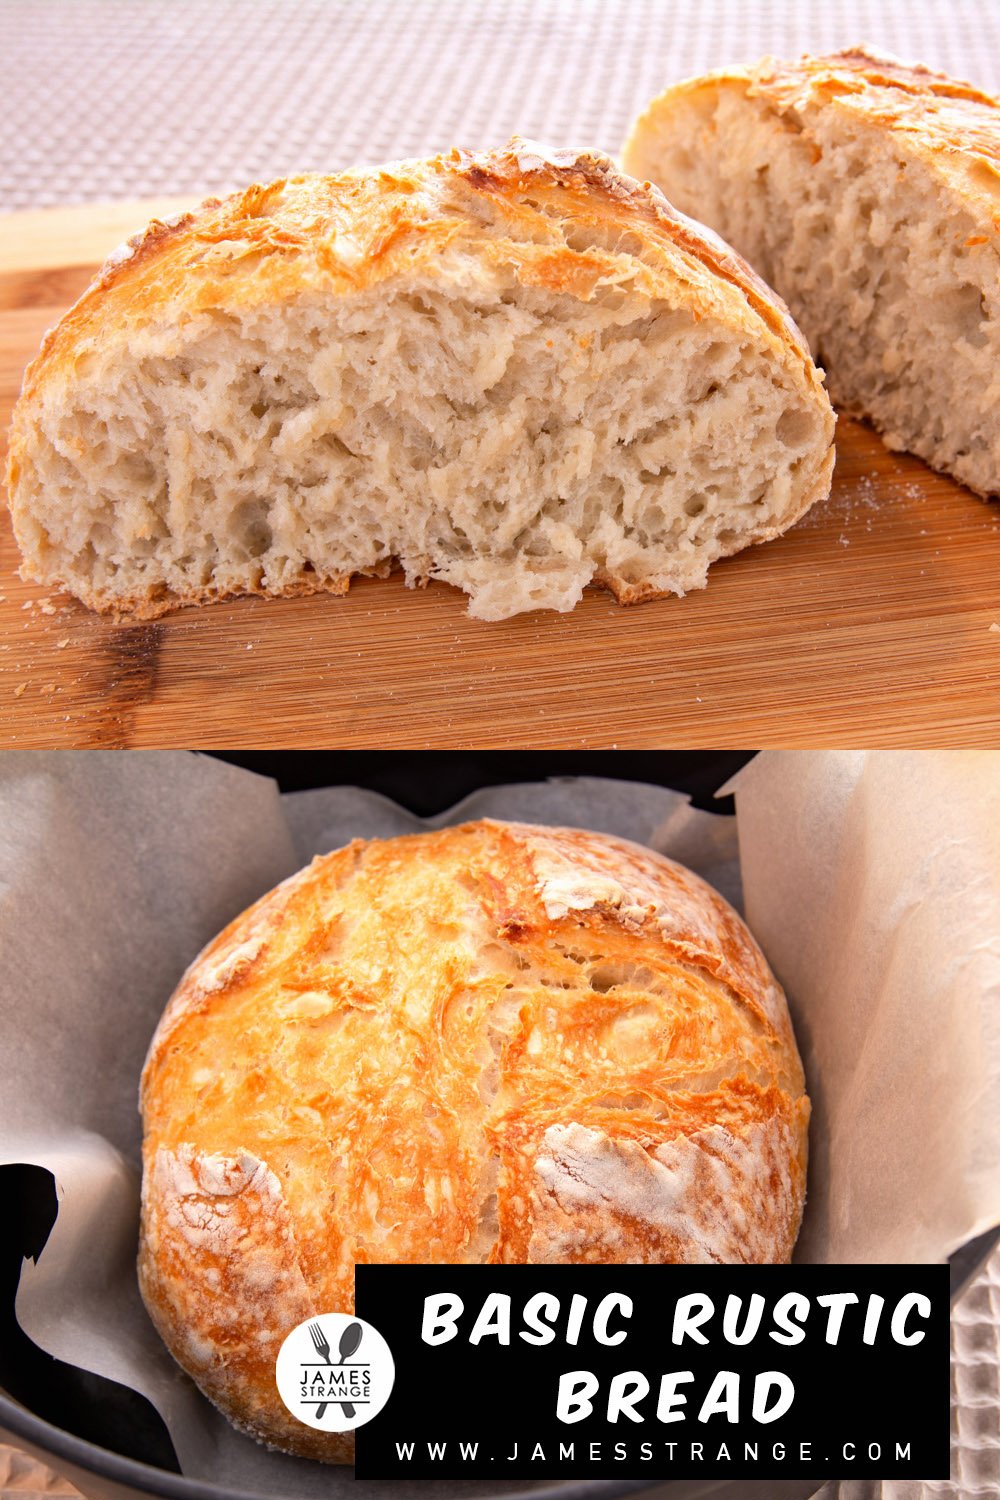
Dutch oven for oven spring:
Ever marvel at loaves with breathtaking oven spring, those dramatic rises that create airy crumb and gorgeous crusts? Well, the humble Dutch oven holds the key to unlocking this baking sorcery!
Think of it as a steamy sauna for your dough. The trapped steam in a preheated Dutch oven creates a humid environment, encouraging your dough to rise higher and faster. This mimics the conditions of a traditional brick oven, where bread baking magic happens!
Here’s how it works:
- Heat it up: Preheat your Dutch oven with the lid on to scorching temperatures. Cast iron retains heat beautifully, creating a fiery inferno for your dough to dance in.
- Seal the deal: Use parchment paper to place your shaped dough (gently, remember heat!) inside the preheated Dutch oven and slam the lid on. This traps the precious steam, turning your oven into a miniature steam chamber.
- Spring into action: As the dough bakes, the trapped steam pushes against it, encouraging it to balloon like a happy cloud. This is where the magic happens – the oven spring that creates those airy pockets and a stunning crust.
- The grand reveal: Finally, remove the lid, and bask in the glory of your perfectly risen, golden-brown masterpiece. The crust will be delightfully crackly, the crumb light and airy – a testament to the Dutch oven’s baking prowess.
- Continue cooking: to develop a colorful crust.
But wait, there’s more! The Dutch oven also helps lock in moisture, resulting in a flavorful and tender crumb. It’s like a magical bread cocoon, nurturing your dough into a thing of beauty and deliciousness.
So, ditch the boring loaves and embrace the Dutch oven revolution. It’s an easy way to level up your baking game, impress your friends with bakery-worthy bread, and unlock the secrets of that sky-high oven spring. Happy baking!
Safety Note: Remember, Dutch ovens get super hot, so handle them with care and use oven mitts when removing the lid. Let the oven and Dutch oven cool down before cleaning.

Forget stressing about thermometers and magic numbers! We’ll know our bread is ready when it’s singing a delicious symphony to all our senses. Here’s what to listen for:
The tapping tango: Give the bottom of the loaf a gentle tap. If it sounds like a happy little drum solo (hollow!), your bread is probably done. But remember, some loaves are the shy singers, so don’t rely on this alone.
The golden glow: Peek at the crust. Is it a toasty, golden brown? That’s a good sign! Just keep in mind some breads are naturally bronzed, like sun-kissed surfers, so don’t judge a loaf by its color alone.
The sniff test: Ah, the aroma! Is it that intoxicating mix of yeasty warmth and sweet surrender? If your nose is doing a happy dance, your bread is likely doing the same in the oven. Trust your sniffer, it knows good things!
Remember, baking is an adventure, not a science experiment. So relax, listen to your bread, and have fun! And if you’re ever unsure, just give it another minute or two in the oven – better safe than dry, right?
Ah, the aroma that’s filling your kitchen right now… pure bread heaven, right? I totally get the urge to grab a knife and dive in right this second, but trust me, fighting the good fight and letting your bread cool is a reward in itself.
Think of it like giving your masterpiece a chance to set and settle. The crumb needs time to firm up, the flavors to meld, and that crust to achieve its full crackly potential. It’s like letting a good story simmer before diving into the next chapter – the payoff is worth the wait!
Plus, cooling prevents steam from getting trapped, which can lead to a soggy bottom (not the good kind of soggy!). And besides, the anticipation builds the excitement, right? Every minute your bread cools brings you closer to that first, glorious bite.
So, while your kitchen sings with the smell of fresh-baked magic, resist the siren song of the knife. Grab a cup of something delicious, put on your favorite tunes, and savor the anticipation. Soon, your patience will be rewarded with a bread masterpiece that’s second to none!
If you enjoyed this, then you absolutely have to try my no-knead sourdough recipe! It’s another fuss-free way to bake up a beautiful loaf, and the tangy sourdough flavor is truly addictive.
Here’s why you’ll love it:
- No kneading is required! Just mix, fold, and let the magic of fermentation do its thing. Perfect for busy bakers or anyone who wants to avoid messy, time-consuming kneading.
- Deep, complex flavor: Sourdough starter naturally develops lactic acid and other flavorful compounds, giving your bread a depth of taste that regular yeast bread just can’t match.
- Crispy, crackly crust: The long fermentation process also helps develop a beautiful, golden crust that’s the perfect combination of chewy and crunchy.
- Incredibly satisfying: There’s something so special about baking your own bread, especially when it’s as delicious as sourdough. The aroma will fill your house, and the satisfaction of slicing into a warm, homemade loaf is truly unbeatable.
So, what are you waiting for? Give my no-knead sourdough recipe a try! You won’t be disappointed.
And if you found it truly helpful and delicious, spreading the word is always appreciated! Sharing on Pinterest and Facebook is a fantastic way to do that, and you’ll be helping my little corner of the internet grow as well.

Ingredients
- 250 grams Flour I used all-purpose
- 162 grams Water
- 1/2 teaspoon Instant Yeast
- 1 teaspoon Salt
Instructions
- In a bowl combine flour, water, salt, and yeast. It will be a shaggy slightly dry dough at this point.250 grams Flour, 162 grams Water, 1/2 teaspoon Instant Yeast, 1 teaspoon Salt
- Cover and let rest for 30 minutes or so.
- Wet your hands and gently perform a stretch and fold. Roll the dough onto itself.
- Cover and let rest for 30 minutes or so.
- Wet your hands and gently perform a stretch and fold. Roll the dough onto itself.
- Cover and let rest for 30 minutes or so.
- Wet your hands and gently perform a stretch and fold. Form the dough into a ball.
- Place the dough into a round bowl that has been lined with parchment paper and cover.
- Let the dough rise until almost doubled in size. Plan for around 1.5 hours.
- Place your Dutch oven into your oven. Preheat the oven to 425F.
- When the oven has been preheated score the dough.
- Remove the Dutch oven from the oven, and remove the lid. Then carefully use the parchment paper to transfer the dough to the Dutch oven.
- Replace the lid and put the Dutch oven into your oven.
- Cook at 425 for 15 minutes.
- Remove the lid and cook until the top is golden brown. Around 15 to 20 minutes.
- Remove the bread from the oven and place onto a cooling rack.