Smoking a chuck roast in your Pit Barrel Cooker is a delightful journey, but let’s spill the beans – these principles work like a charm for other beef roasts and various smokers too. And guess what? You won’t even need BBQ sauce because the results are that good.
Now, let’s dive into the juicy details. Chuck roast, well, it’s like that versatile actor who goes by many names – 7-bone roast, shoulder steak, boneless chuck roast, or chuck shoulder pot roast. My personal favorite is the 7-bone roast if I can find it. No matter what it’s called, a chuck roast might have a bit more internal fat and connective tissue compared to a brisket or round roast. With its rich, beefy flavor, some folks even call it the “poor man’s brisket.”
Speaking of brisket, as much as I adore smoked brisket, it’s not always practical unless you’re feeding a small army.
Now, the million-dollar question: which smoker works best for smoking a chuck roast? Well, the truth is, you can achieve tasty results on almost any kind of smoker. They all have their pros and cons, so it boils down to how much babysitting you’re willing to do during the cooking process.
- Charcoal Grill: If it has a lid and can keep the heat and smoke inside, it can work. But be ready to give it some extra attention, like adding more charcoal and wood during the cook.
- Pellet Smokers: These are fantastic if you’d rather spend less time fussing over your cooker, especially the ones with automatic temperature control. Set your desired temperature, and the smoker does the rest. Plus, you can choose from a variety of wood pellets for that perfect smoke flavor.
- Electric Smoker: Yep, you can get great results with an electric smoker. Just toss in some wood chips, and you’re good to go. Without the chips, it’s more like a classic pot roast. Electric smokers are a solid choice for areas with strict no-open-flame rules. Some may require a water pan to keep your meat from drying out.
- Stick Burners: The original gangsters of smokers. They need a little TLC during cooking, but many BBQ veterans argue they deliver the best flavor.
- Pit Barrel Cooker: That’s what we’re using today. It does need a bit of attention but not too much. I’ve had fantastic results with mine, but I won’t claim it’s the absolute best – BBQ debates have started over lesser things.
- Slow Cooker: Crockpots are awesome for many dishes, but don’t expect that smoky flavor from them. Reserve your slow cooker for things like beans.
Here’s the bottom line: don’t sweat over which cooker is the ultimate champion. BBQ is about embracing the slow and low–low heat, lots of time, and, most importantly, quality time with friends and family. So, let’s keep the stress away and focus on what truly matters in BBQ – good company and great memories.
Let’s talk about dry brining your chuck roast – it’s a game-changer for flavor.
- The Magic of Dry Brining: Dry brining is like a culinary secret weapon – it gives your meat a glorious crust, amps up the flavor, and can even make it more tender. The ideal approach is to dry brine your beef a day in advance, but for this cook, a few hours will still do wonders.
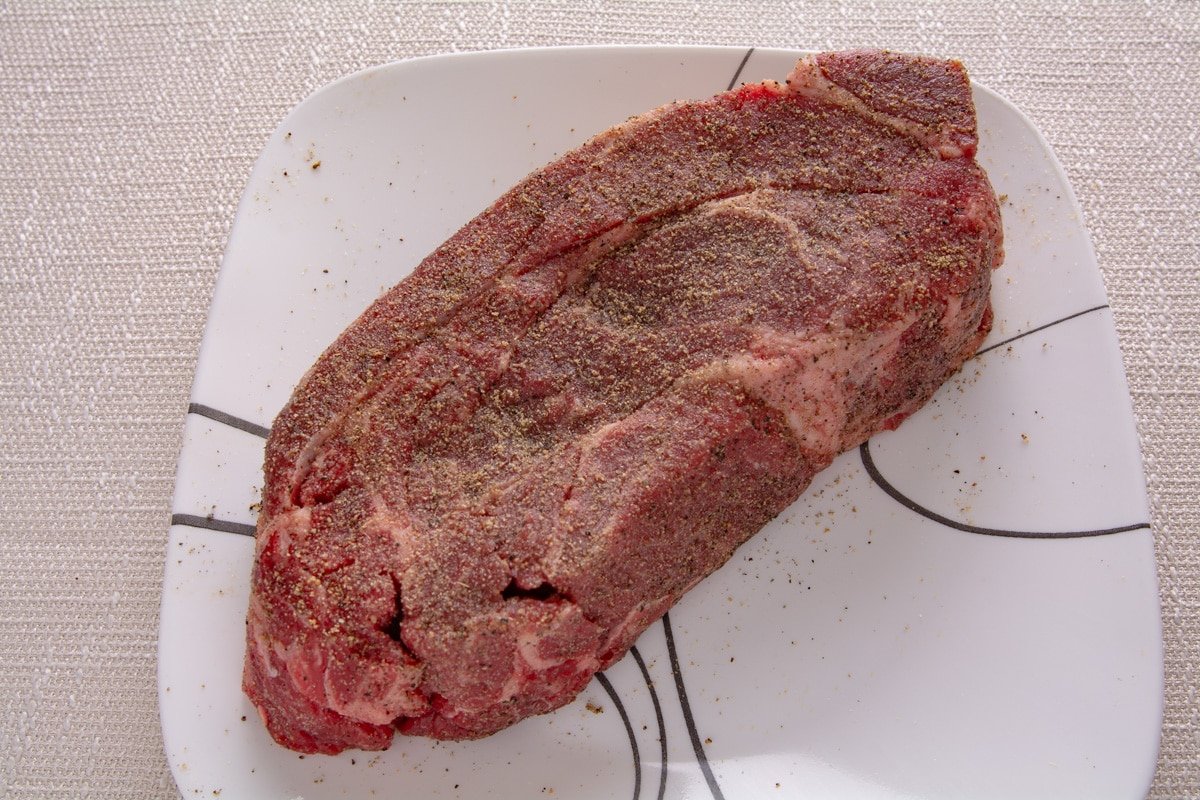
- Spice Things Up: Start by whipping up your dry rub or spice mix in a small bowl. I prefer keeping it simple with equal parts of sea or kosher salt, black pepper, and granulated garlic (or garlic powder). If you’re feeling adventurous, throw in extras like onion powder, brown sugar (not for the low-carb enthusiasts), paprika, or Cajun seasoning – it’s all about personal taste.
- Prep the Meat: Take some paper towels and gently blot away any moisture from the surface of your roast. If there’s an excess of fat, a sharp knife can help trim it down.
- Rub it In: Sprinkle that flavorful spice rub all over your roast, ensuring you get the sides as well. For the best results, set the roast on a wire rack and let it chill in the fridge.
- Room Temperature: About an hour before cooking, take the roast out of the fridge. This helps the surface of the meat reach room temperature, setting the stage for even cooking.
- No Brine? No Problem: It’s worth noting that you can still achieve excellent results without dry brining. Some of my friends prefer a different approach, taking the meat straight from the fridge, rubbing it with olive oil, yellow mustard, or Dijon mustard, adding a bit of rub, and straight into the smoker.
Whichever path you choose, it’s all about delicious, tender results. Happy cooking!

On to the cooking.
- Charcoal Arrangement: Fill up that charcoal basket to the brim with charcoal goodness. Now, scoop out enough to halfway fill your charcoal chimney.
- Basket Placement: Nestle the basket snugly into the bottom of your trusty cooker, setting the stage for some tasty action.
- Chimney Fire: It’s showtime for the chimney. Start a fire underneath it using paper, or any other trusty ignition method you prefer.
- Red Glow: Keep an eye on the chimney. When you see most of that charcoal turning a fiery red, it’s go time. Dump ’em onto the charcoal in the basket with a satisfying sizzle.
- Wood Chunks: Don’t forget the wood chunks – toss ’em in for that irresistible smoky flavor.
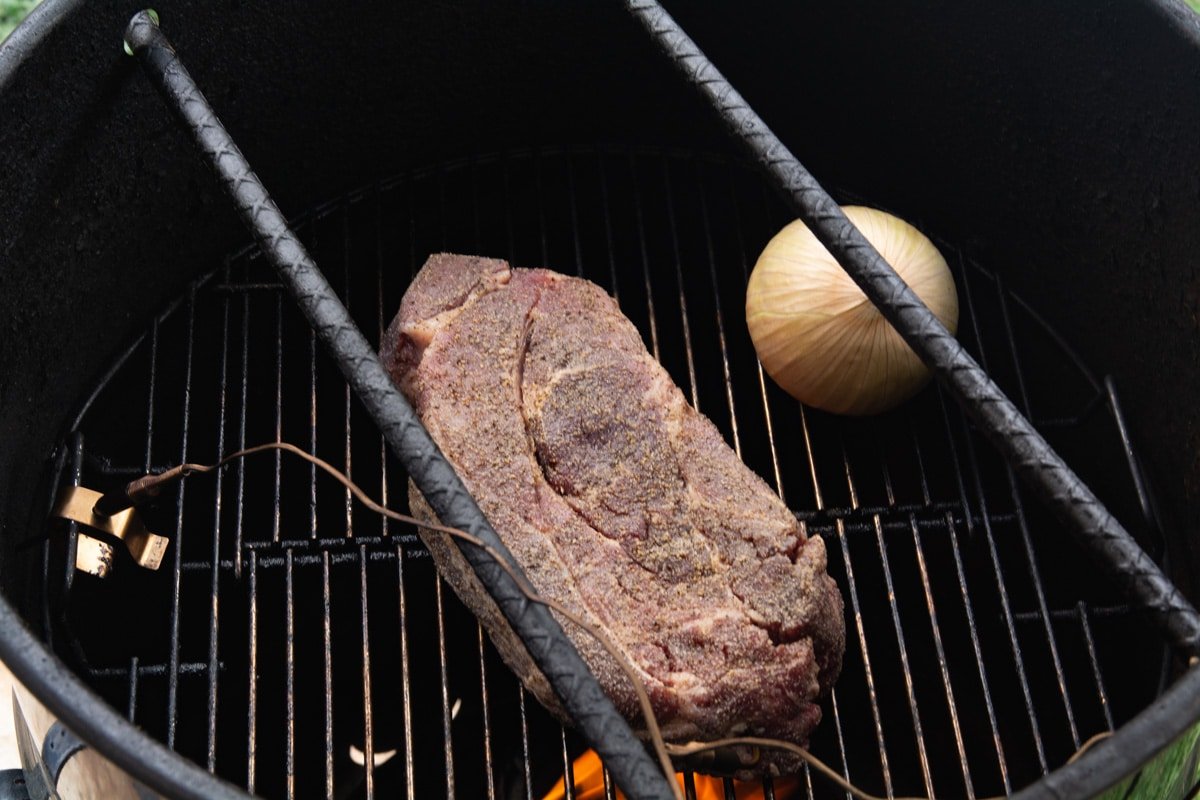
- Temperature Control: Now, it’s time to bring out the temperature probes. One’s your loyal smoker temperature monitor, and the other’s your trusty meat probe. Stick ’em in place, and let the monitoring begin.
- Grate and Rebar: Place the rebar and grill grate with a sense of anticipation, knowing they’re about to host something delicious.
- Lid’s On, Almost Closed: Gently close the cooker’s lid, just a crack. Adjust the damper, leaving it nearly fully closed. The magic’s about to happen.
- Prep Rush: As everything gets cozy in there, it’s time for a quick dash to gather all the essentials, including that lovely piece of meat. And sometimes, there’s that last-minute grocery store run for the forgotten items – we’ve all been there.
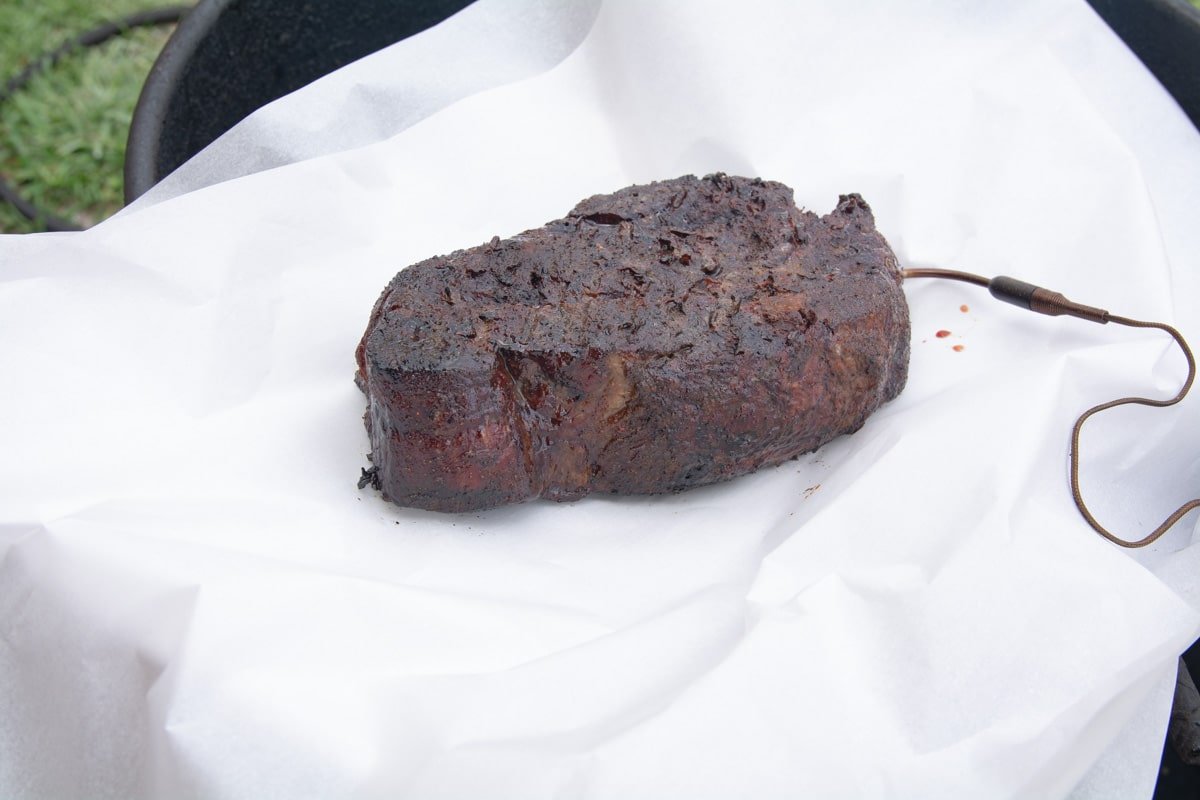
TempSpike Setup: This smart device has taken the place of my old two-probe setup. It’s a wizard at monitoring both meat temp and barrel temp simultaneously.
Roast Placement: Gently position your chuck roast on the grill grates. While some prefer hooks to hang it, your tried-and-true method keeps it securely on the grates.
Seal the Lid: Close the lid securely and let the BBQ magic unfurl. Your chuck roast is about to transform into a flavor sensation.
Temperature Watch: Keep a vigilant eye on your cooker’s temperature. It often starts around a toasty 270 to 300 degrees Fahrenheit but soon mellows out.
The Sweet Spot: The magic temperature range for my barrel is 250 to 275 degrees Fahrenheit, delivering the finest BBQ results. This range prevents the meat from drying out. When it comes to the meat temp, the goal is 205 degrees Fahrenheit.
The ThermoPro TempSpike has your back, and you’ve perfected the BBQ process. Enjoy the journey, and may your chuck roast turn out utterly mouthwatering!
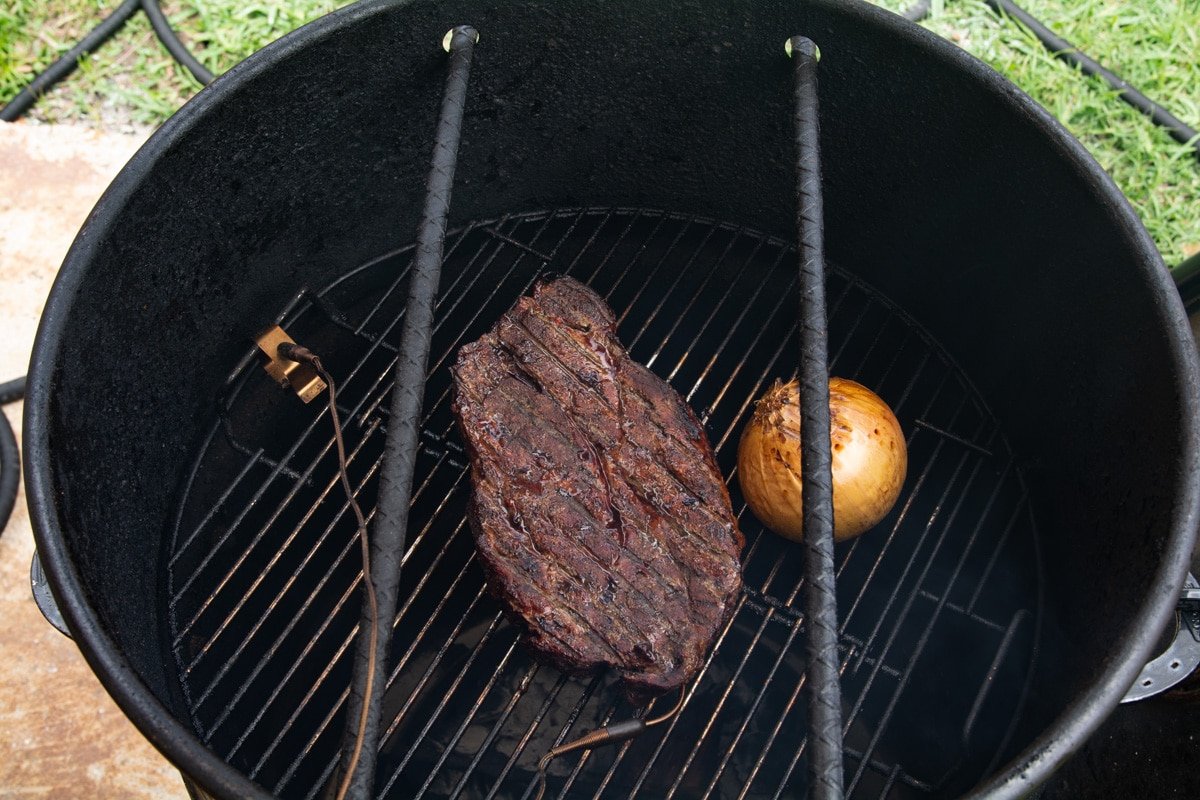
Flipping the roast at the 150°F mark is a smart step in ensuring even cooking and a delicious result. Keep up the excellent work, and let that chuck roast sizzle to perfection!
What is the Texas Crutch?
The “Texas Crutch” is a brilliant technique used in smoking to keep your meat tender and moist while maintaining that sought-after bark. Here’s the scoop:
As your meat smokes, it releases fat, and its connective tissue gradually breaks down. This process is fantastic for developing that mouthwatering bark, but it can also risk drying out the interior of the meat, especially if you’re cooking at lower barrel temperatures.
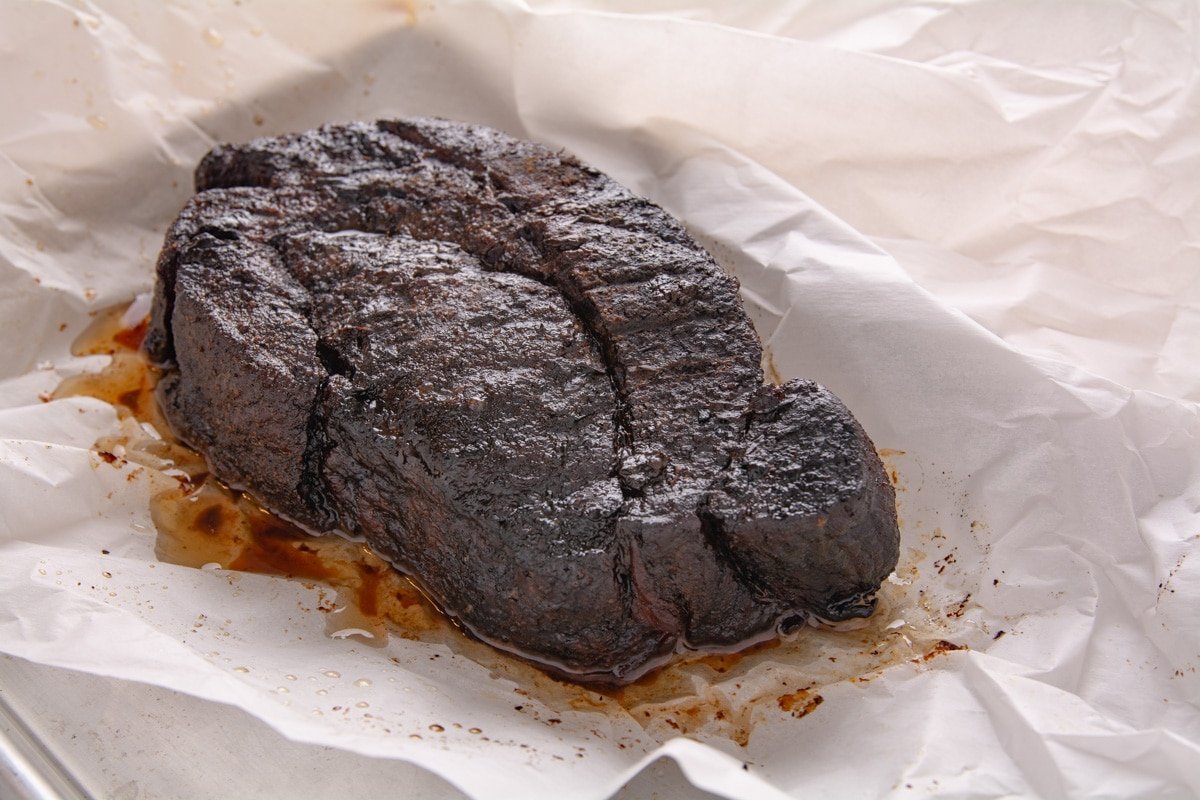
To remedy this, you can wrap your meat in either aluminum foil or butcher paper. This creates a moist environment that transforms a potentially tough cut of meat into a beautifully tender masterpiece. The ideal time to wrap is when a digital thermometer shows an internal temperature between 160 to 175 degrees Fahrenheit. The higher the temperature before wrapping, the more pronounced the crust. Conversely, wrapping at a lower temperature yields exceptionally moist meat. It’s all about finding that balance.
In your case, you wrapped your chuck roast at 165°F, and it’s understandable that circumstances led you to use parchment paper.
If you’re aiming for exceptionally tender meat, like a smoked pot roast, you can take things up a notch. Place the roast into a foil pan with some braising liquid, such as beef broth or red wine, cover it with several layers of foil, and return it to the cooker.
After wrapping, continue to cook the roast until the internal temperature reaches 195°F. This is perfect for slicing. If you’re leaning more toward pulled beef, aim for 205°F. Keep in mind that cooking times can vary based on various factors, but your journey is usually just over five hours. Enjoy the mouthwatering results of your BBQ expertise!

Ah, the crucial resting period – it’s like the grand finale of your BBQ masterpiece. Here’s the scoop:
After your meat emerges from the cooker, it’s tempting to dive right in, but patience is your ally. Let that mouthwatering creation rest for a bit. A good rule of thumb is a 30-minute to one-hour resting period. This magical time allows the juices to redistribute, transforming your chuck roast into the perfect Sunday dinner.
Here’s a handy tip during the rest period: If you wrap your meat with paper, keep it wrapped tightly. However, if you opted for foil, give it a bit of breathing room by loosening it up. This way, the steam can escape, and you’ll be left with a delectable, tender result that’s simply irresistible.
Holding smoked meat in a cooler
Holding smoked meat in a cooler is a practical technique to keep it warm and tender until you’re ready to serve. Here’s how to do it:
- Select the Right Cooler: Choose a clean, large cooler that can accommodate the amount of smoked meat you want to store. Make sure it’s in good condition and well-insulated.
- Preheat the Cooler: Before placing the smoked meat in the cooler, warm it up. Fill the cooler with hot water and let it sit for a few minutes. This helps raise the internal temperature and ensures better heat retention.
- Wrap the Meat: Wrap your smoked meat in heavy-duty aluminum foil. You can also use butcher paper or even old towels to help keep the meat warm.
- Add Towels or Blankets: Line the bottom of the preheated cooler with towels or blankets. This extra insulation will help maintain the meat’s temperature.
- Place the Meat in the Cooler: Carefully position your wrapped smoked meat inside the cooler. Ensure there’s as little empty space as possible.
- Fill Any Gaps: If there are gaps around the meat, fill them with more towels or blankets. The goal is to minimize heat loss.
- Close the Cooler Tightly: Seal the cooler’s lid tightly to trap the heat inside. You can even wrap the cooler with additional towels or blankets for extra insulation.
- Check the Temperature: You can periodically check the internal temperature of the meat with a meat thermometer to ensure it remains within the safe temperature range.
This method of holding smoked meat in a preheated cooler can keep it warm for several hours. It’s an excellent way to maintain the meat’s tenderness and flavor until it’s time to serve. Enjoy your perfectly preserved smoked delicacy!
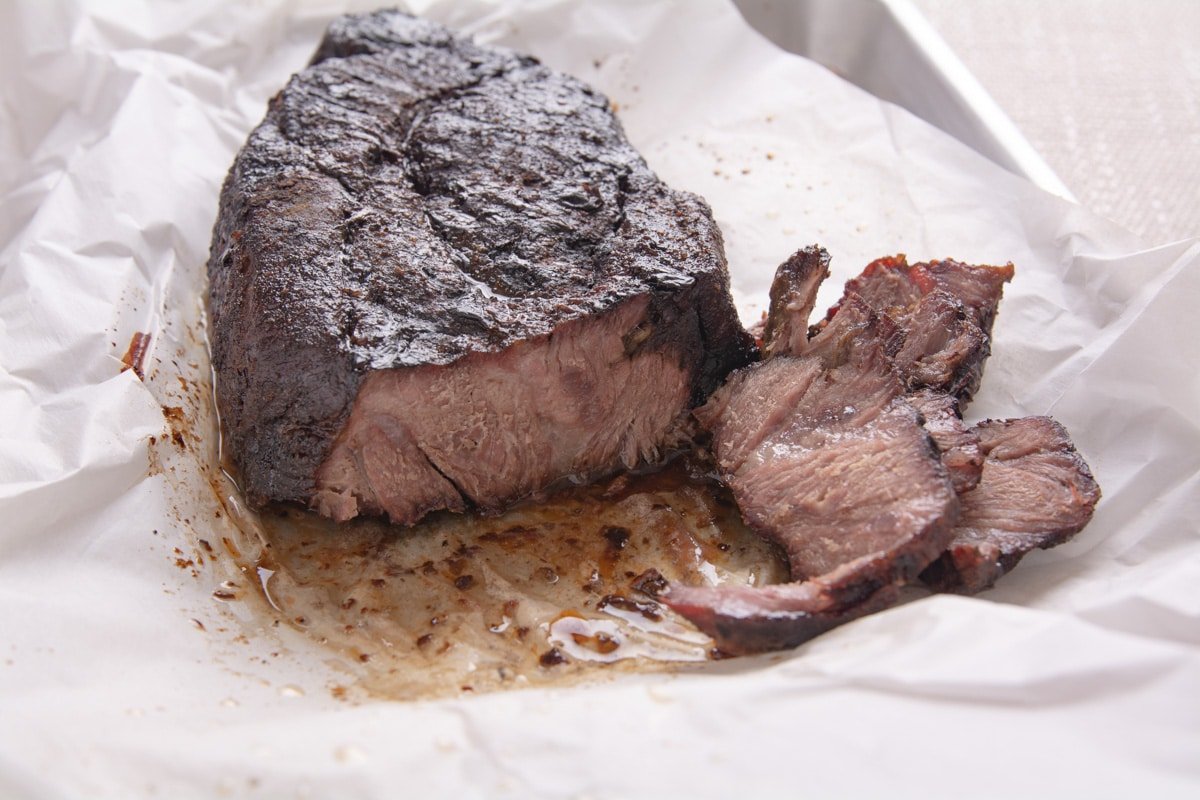
Here’s how mine turned out on the inside – sporting a delightful bark while staying tender and juicy within.
A great side to serve with this chuck roast would be this easy corn casserole found at Splash of Taste.
I had a little bit left over so I used it to make chili rellenos.
You might also enjoy these Pit Barrel Cooker recipes for beef brisket and pulled pork.

If you found this recipe as delightful as I did, please consider sharing it with your friends. The more, the merrier, right? Happy cooking and sharing!

Ingredients
- 3 pound chuck roast
- 1/2 teaspoon Salt
- 1/2 teaspoon black pepper
- 1/2 teaspoon Granulated garlic
Instructions
- Dry brining od chuck roast
- Mix together the salt, black pepper, and granulated garlic.
- Season the meat with the spice blend then place the meat into the refrigerator until ready to use. Take out one hour before cooking.
- Build a fire and preheat your smoker.
- If using place your temperature probe into the meat
- Add the meat to your cooker / smoker and close the lid
- Cook until the internal temperature of the meat reaches 145 to 150 F then flip over.
- Cook until the internal temperature of the meat reaches 160 to 170 F. Then wrap the chuck roast. Place back into the cooker.
- Cook until the desired internal temperature of the meat has been reached. (195 to 205F)
- Rest the meat for 30 minutes to 1 hour.
- Slice and serve.